24 Feb – 2 March, 2025 — Donita Kadharusman
Games Art Pipeline 24/25
2D — Creature Concept, Week 2
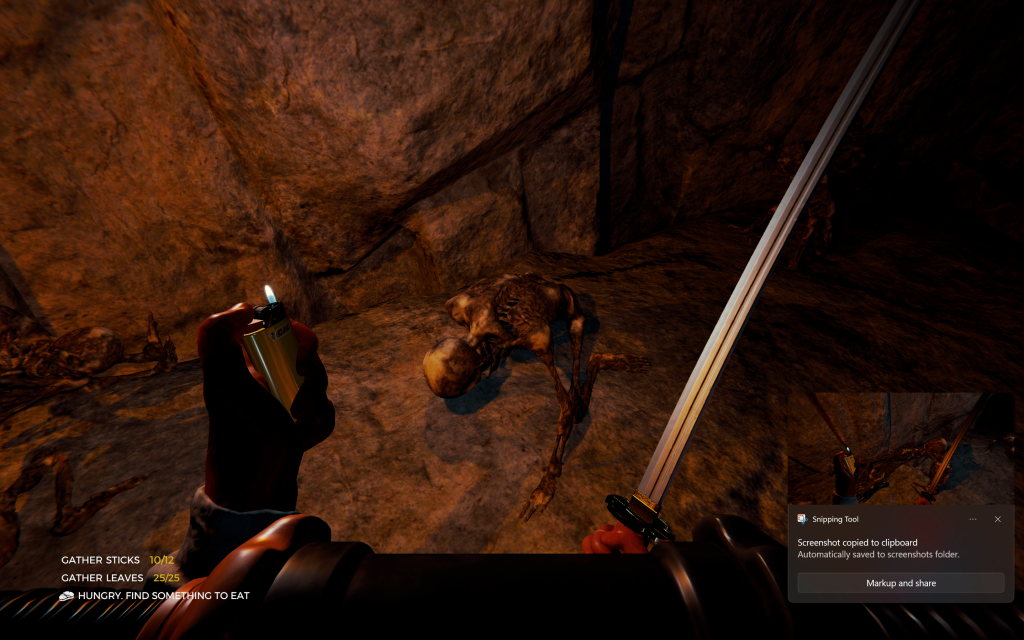
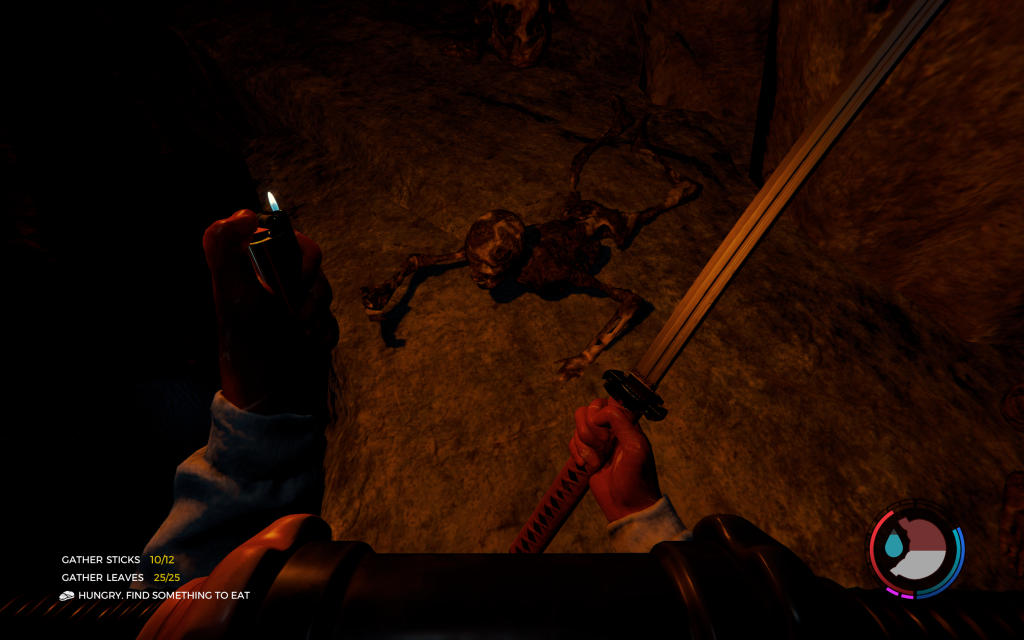
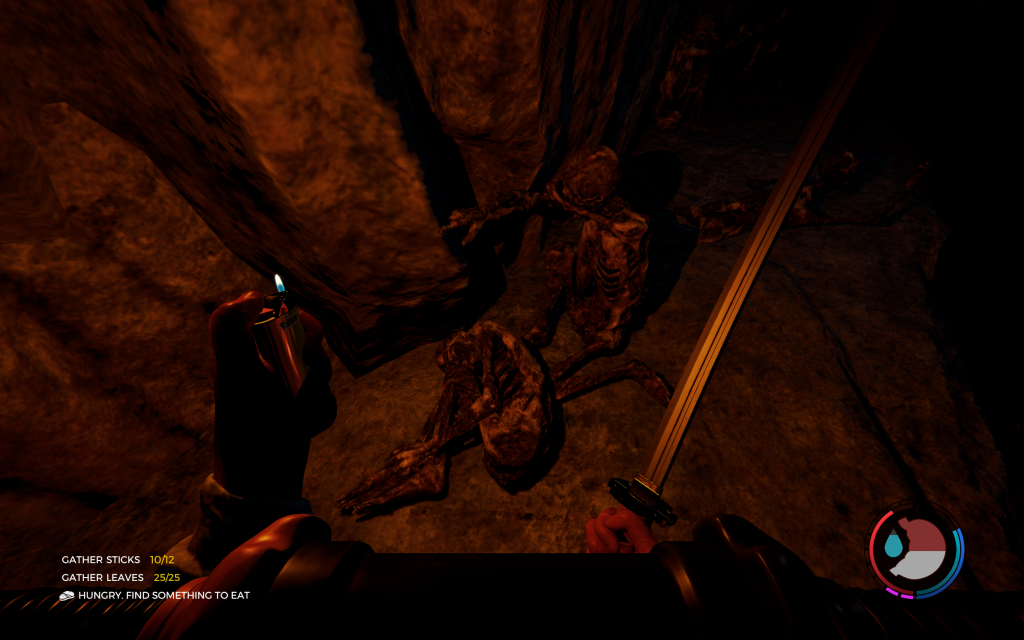
The Forest
While playing The Forest (2018) with my friend, I came across a cave system near the end of the game. This cave led to the final experimentation lab, which caused the cannibal outbreak. It showed that individuals associated with the lab (possibly the scientists) suffered and then died on the spot due to the disaster, this detail adds depth to the backstory. Because of this, I’d want to incorporate deceased scientists into my character concept to add horror and further show the depth of its laboratory backstory.
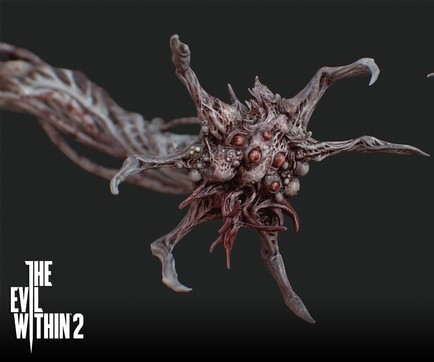
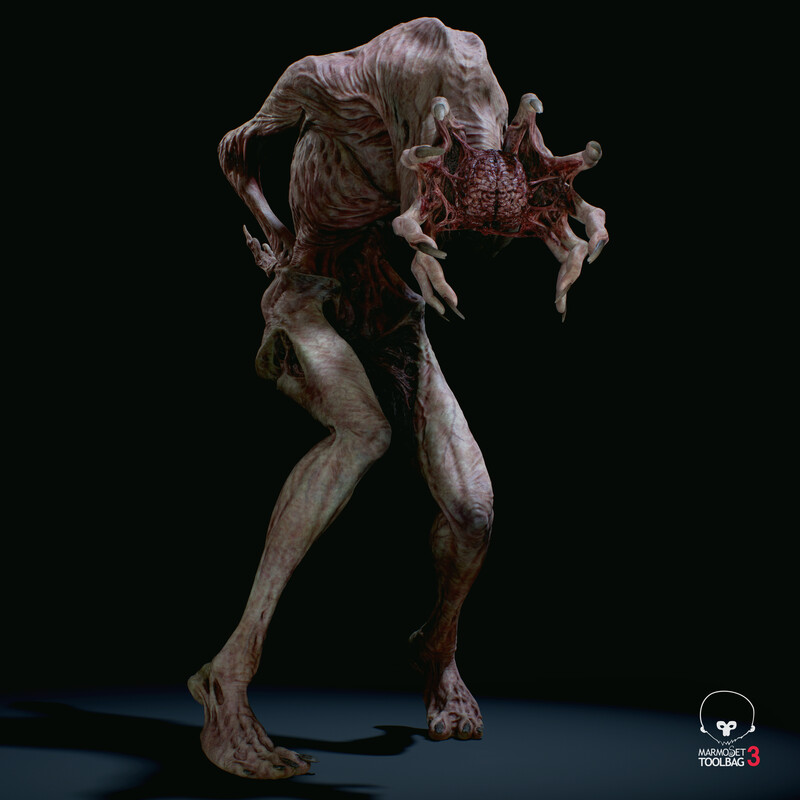
Yosuke Ishikawa
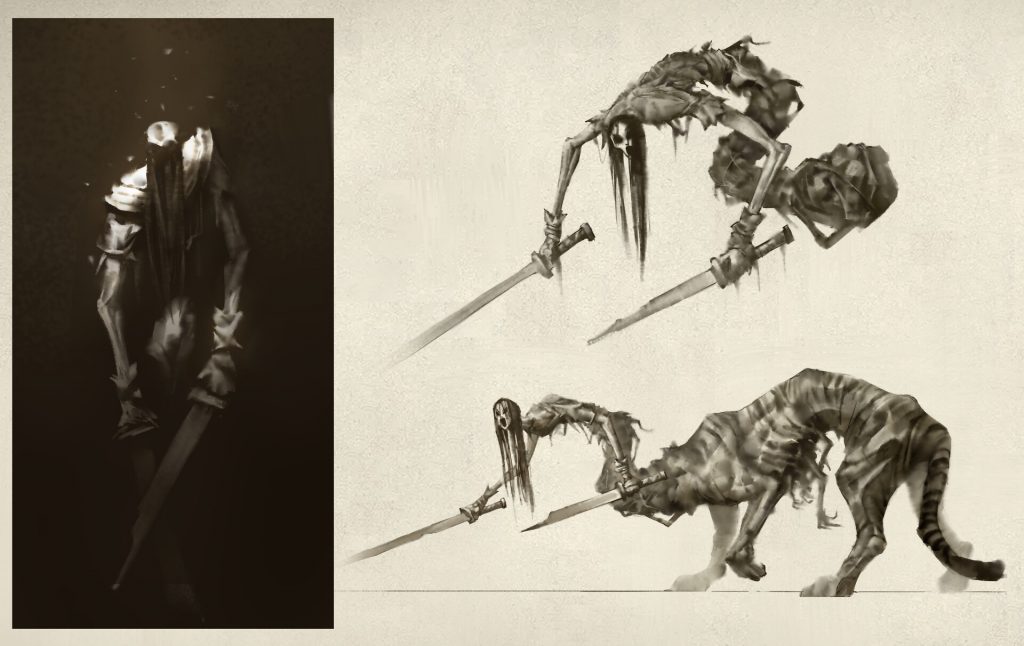
As week 2 started, we were briefed on our 3D modelling task and our tutor shared various talented artists for us to look into. Among them, I found Yosuke Ishikawa’s 3D models incredibly detailed, therefore I aim to achieve this level of realism and detail for my own character. Hence, I closely observed these details, such as the strategic placement of bumps to avoid cluttering and maintain the focus on the main focus of the character. Another aspect I observed was how he renders blood; it often pools in holes, meaning it would have a darker shade of red. This adds a sense of realism to the character. From these observations, I came to a realisation that details are put to support and enhance the character, whether it’s the backstory, the behaviour, or movements, rather than overwhelm it. Therefore, I’d want to apply all these aspects I observed to my character.
Character Silhouettes
Even if I did further research on my character concept, I still struggled to visualise it. Fortunately, I found a YouTube tutorial by Aaron’s Design Class (2018) titled ‘Silhouette Drawing Methods‘, which helped me get started. In this video, he recommended using cloud pictures to create loose silhouettes from the cloud’s shape. Additionally, I followed 花先舍’s technique of using real-life references in my character (2024). With the two of them combined, I was able to create some character silhouettes, even if the process didn’t go as smoothly. Still, that is part of doing experimentation.
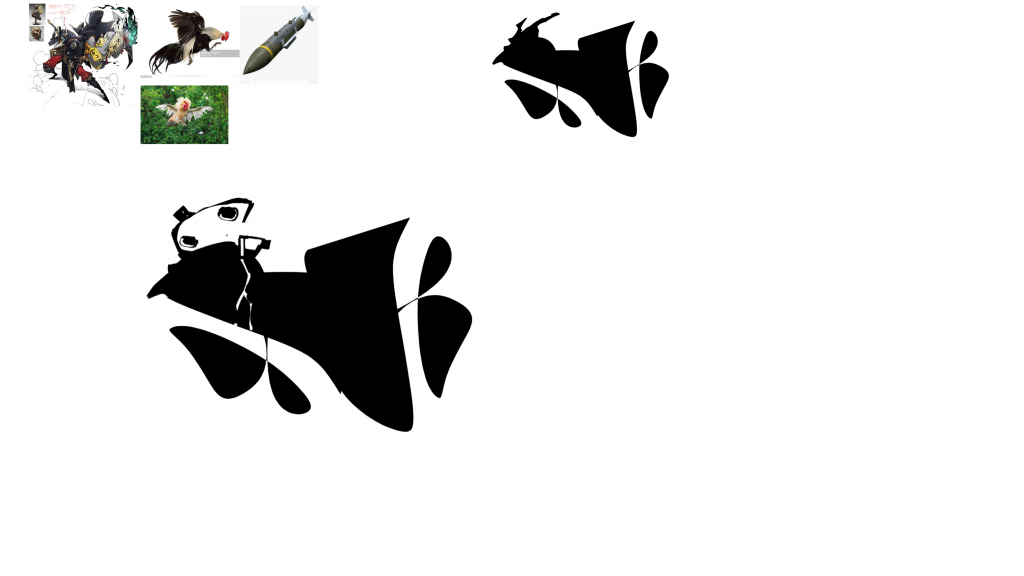
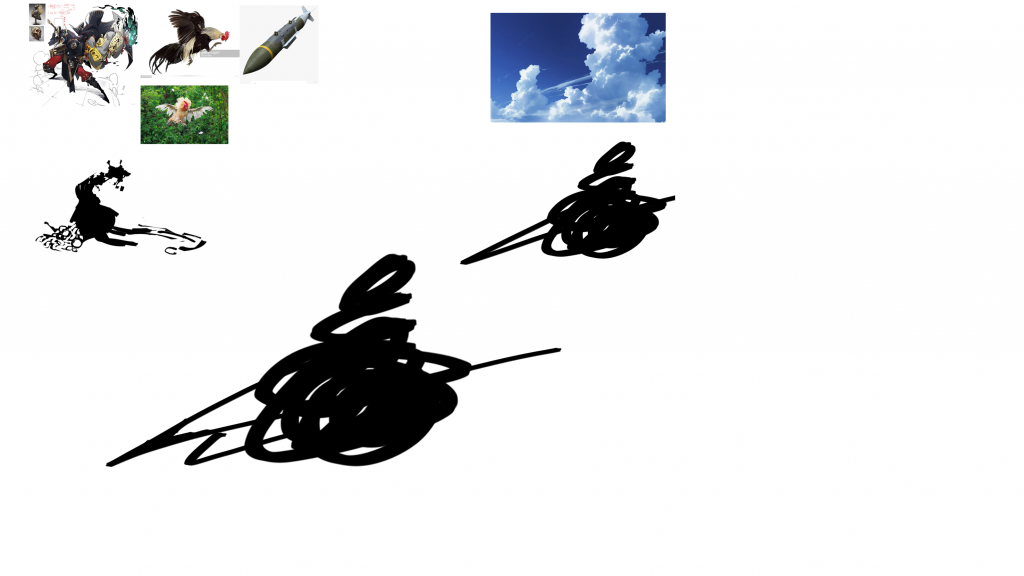
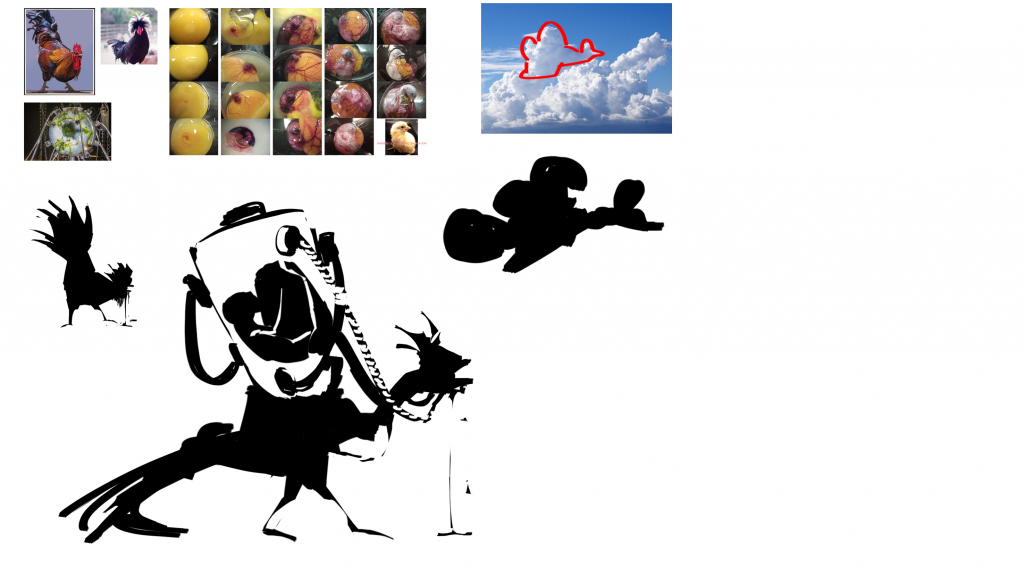
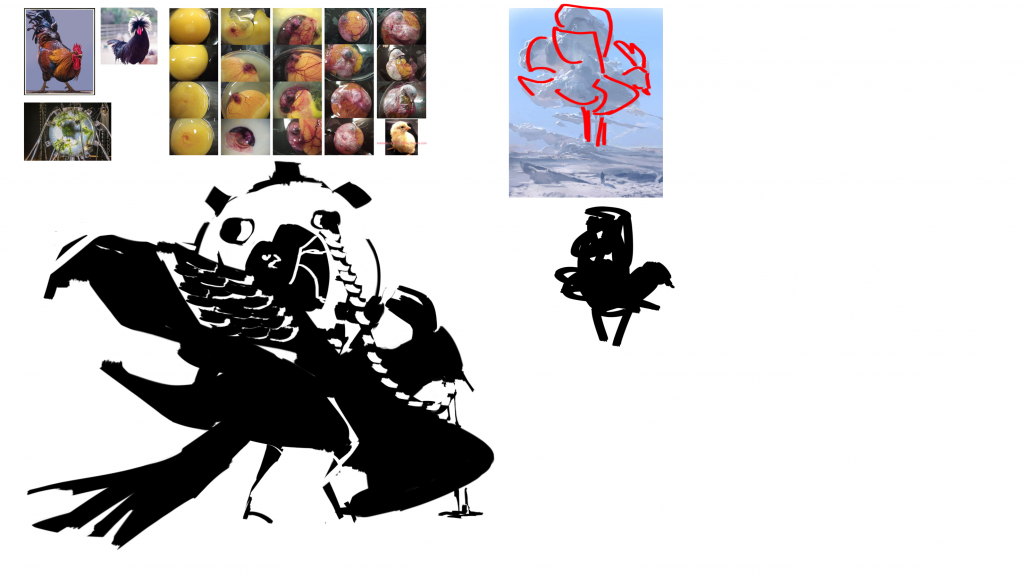
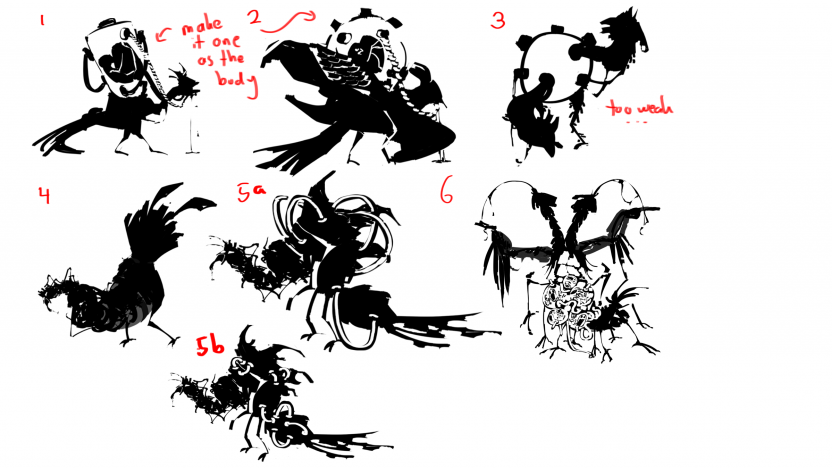
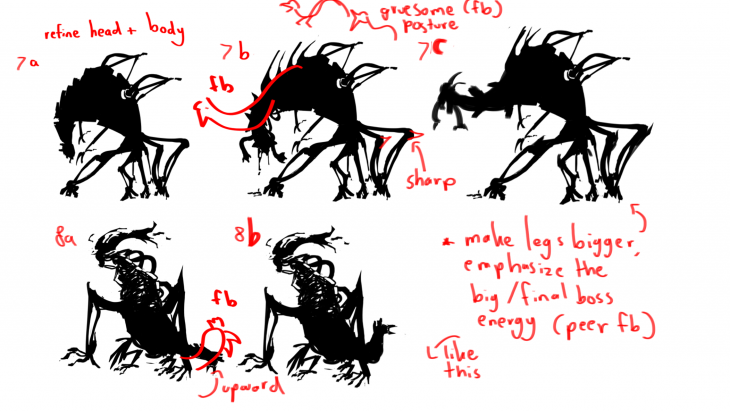
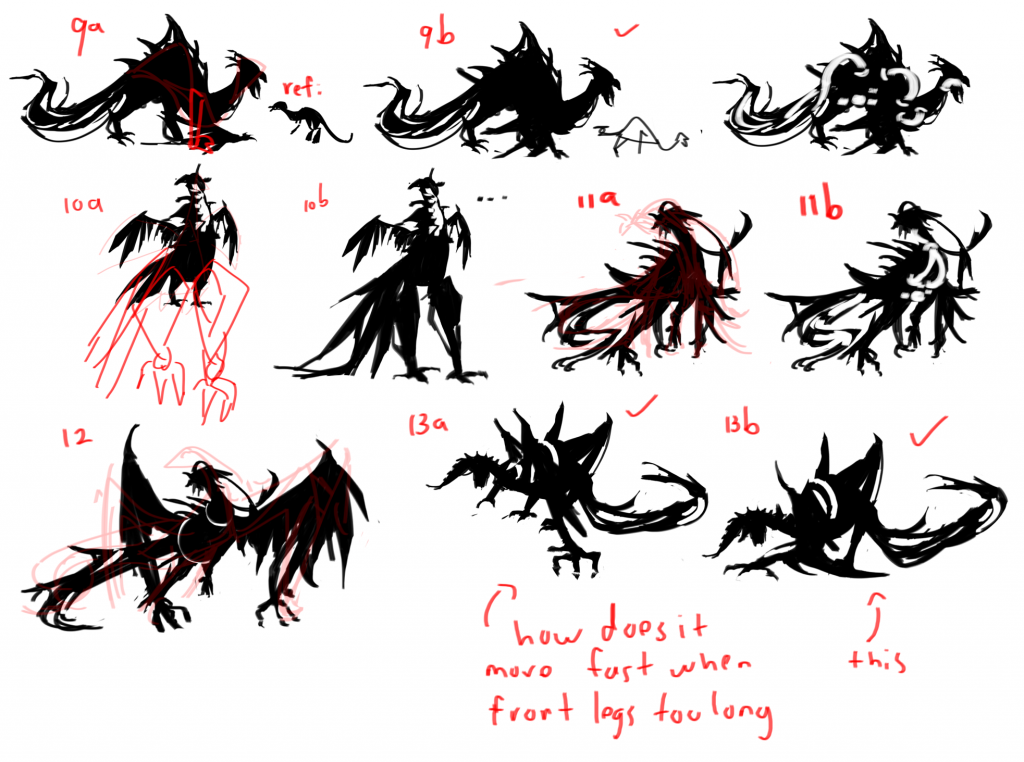
I was satisfied that I was able to incorporate laboratory elements into the silhouettes, yet I was still not satisfied with how weak the first 3 silhouettes looked, as my main intention was to make a big bad final chicken boss. I believe the lab containment on their bodies overpowers the chickens, which is why they look weak. So, I tried to develop more silhouettes (see silhouettes 4-6), while also improving the body horror by adding strings or fluid silhouettes. I could say that the silhouettes improved, however, they still look overly chaotic and heavy making them look like they move slow, making them hard to prey. On top of that, some still lack clear shape language.
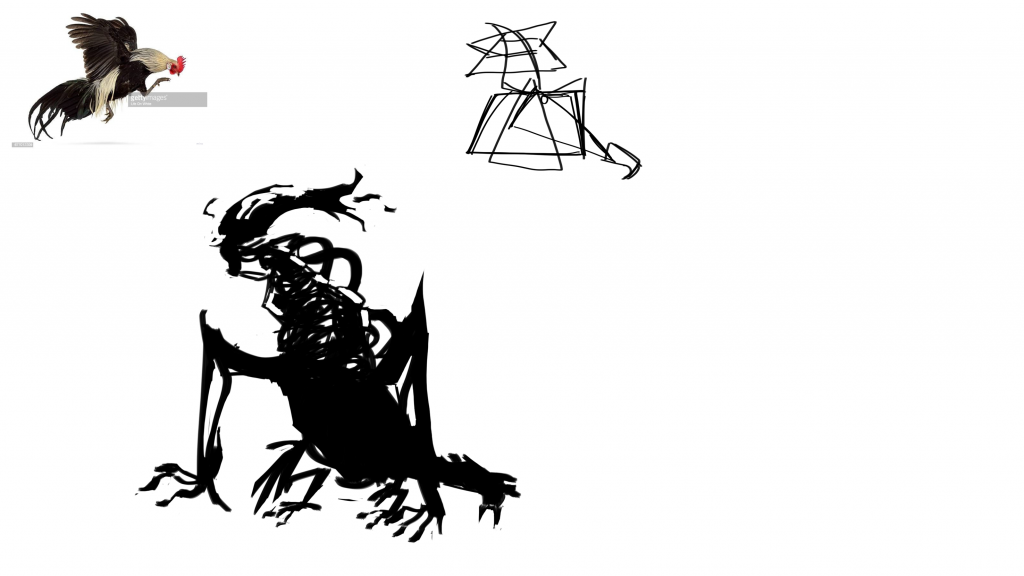
During class, our tutor suggested using shapes as the foundation for our silhouettes. I realised that this approach could help solve my previous problem of lacking shape language. Remembering my study on Earl Lan’s concept characters of Creature of Horrors (Lan, 2024), I tried bending these base shapes to add more fluidity and dynamism to the characters’ poses. At this stage, I pushed myself to think more creatively and I came across an idea to flip the chicken reference upside down to add to its uniqueness and chaos into my character.
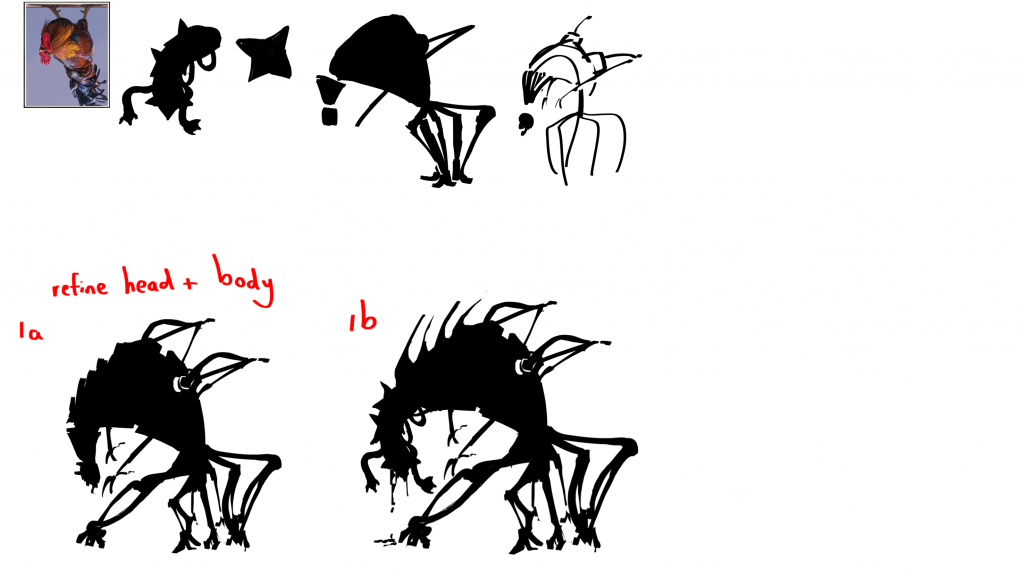
Silhouette 7 looks as if it moves fast because of its slender legs, yet it still comes across more as a minion rather than a final boss. On the other hand, silhouette 8 gives off a final boss character vibe, but its bulkiness suggests it moves slowly, which doesn’t align with my original intention.
Feedback: Refine silhouette 7b’s head posture and make it more gruesome (reference: roaring T-rex).
Peer suggestion: Make legs bigger to emphasize boss energy.
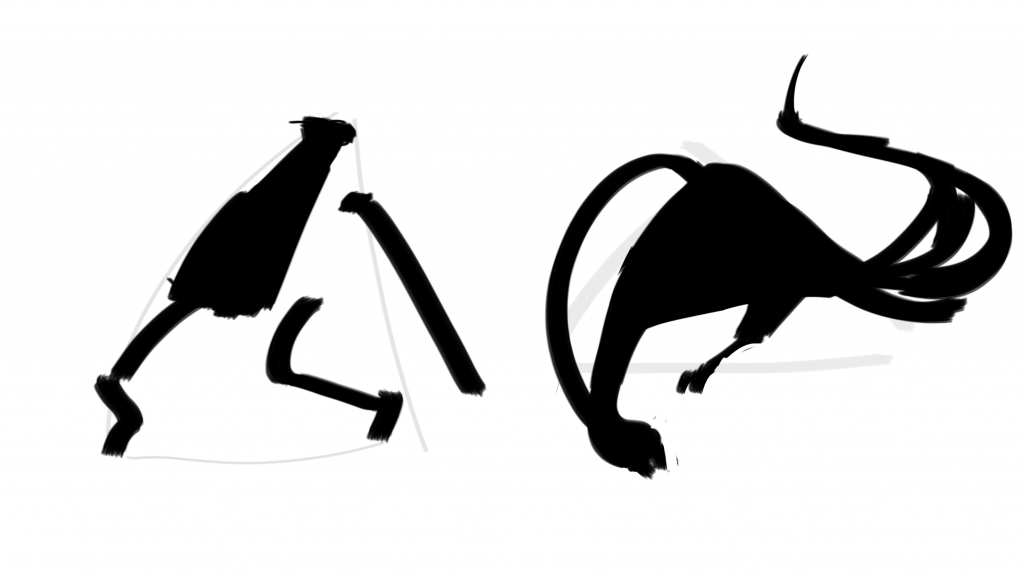
After receiving my tutor’s feedback, I decided to study how predators pose. I came across 黑男’s illustrations (2022), which show characters in a ready-to-pounce stance, this evokes a sense of danger and tension. Hence, I will employ these poses for my future silhouettes and strengthen the predatory energy I’m aiming for.

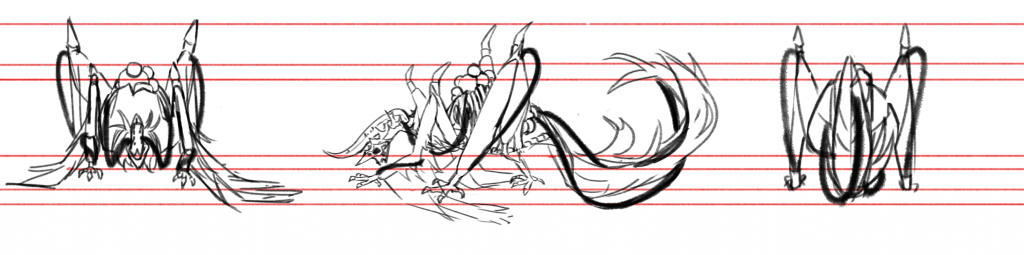
This time, I relied more on pose references I’ve gathered as a guide for my silhouettes’ poses. In the end, I asked my tutor to decide on the final silhouette. After some thinking, he narrowed it down between silhouettes 9 and 13, while my own pick was 13b. Although I love the design from 9b, I thought that the chicken gave off a slower and more passive atmosphere than the one from 13b. Hence, choosing silhouette 13b as my final silhouette to develop further.
Character Sketches
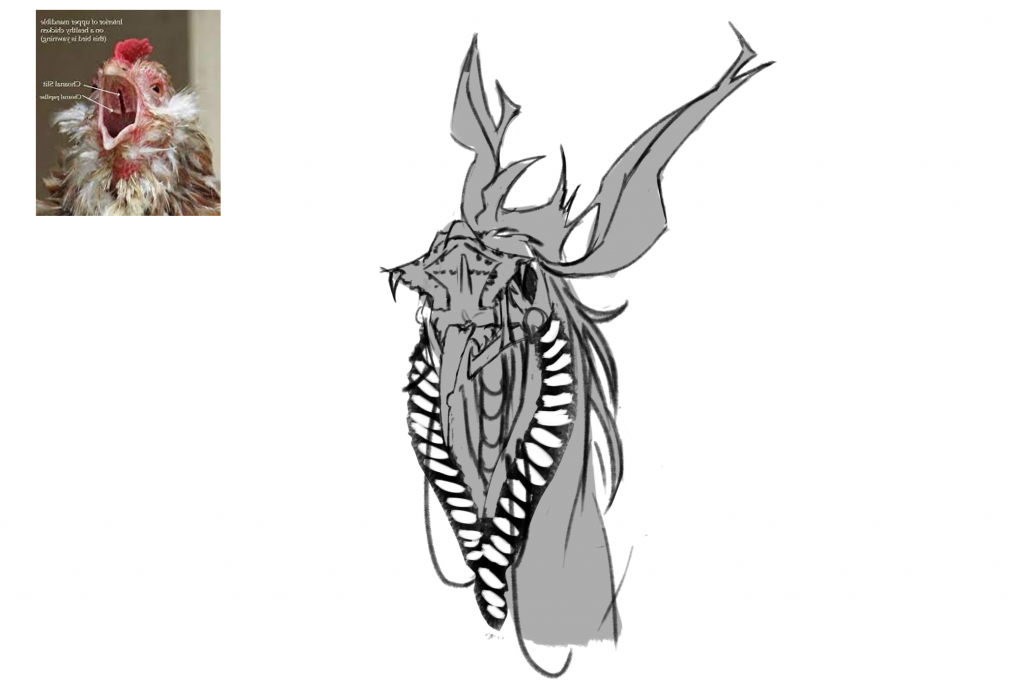
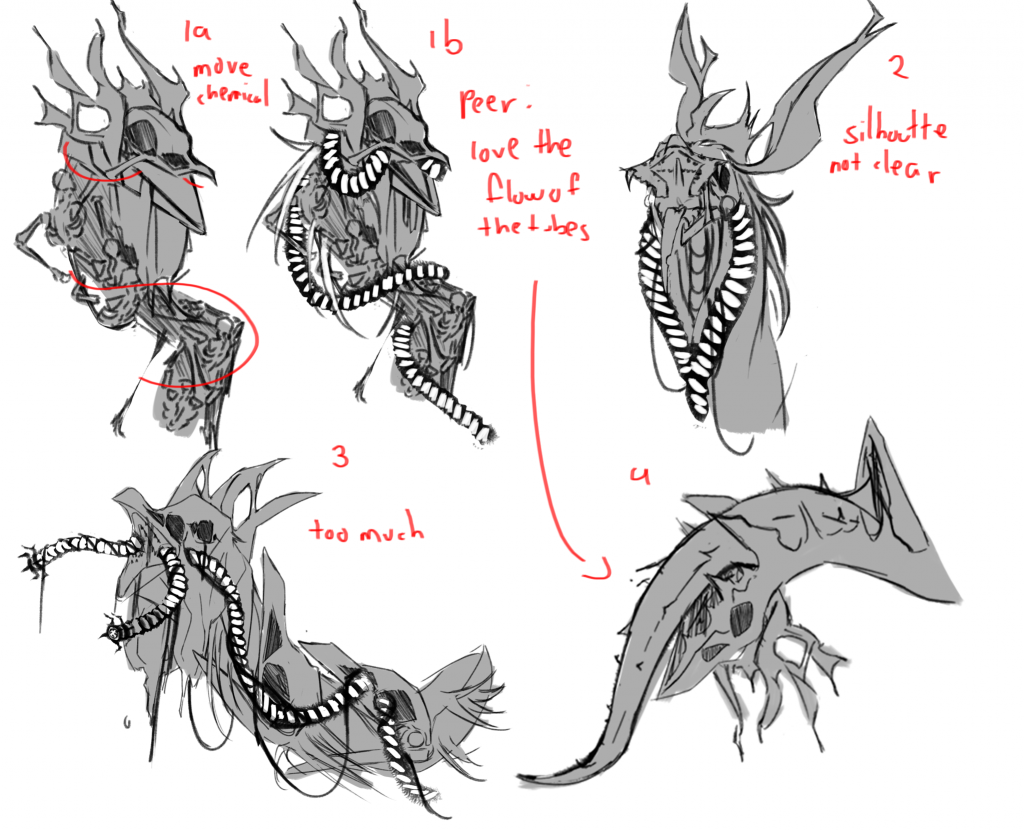
With the silhouettes done, I continued to brainstorm the design of the chicken’s head. The first concept was heavily inspired by 黑男’s illustration (2022) and The Forest (2018), applying the eerie idea of the deceased crawling up its neck. I found this concept to be fascinating as I view this as an interpretation where the dead are desperately trying to prevent the chicken from fully rising. I took inspiration from Pokémon: The First Movie (1998) as well, where I applied laboratory elements to the chicken to exaggerate its backstory. Additionally, this concept adds horror element to the head. In contrast, I focused on adding grotesque visual features to the second and third head design. The second design exaggerated the interior of a chicken’s mouth, while the third explored a disturbing idea of heads popping out from one to another
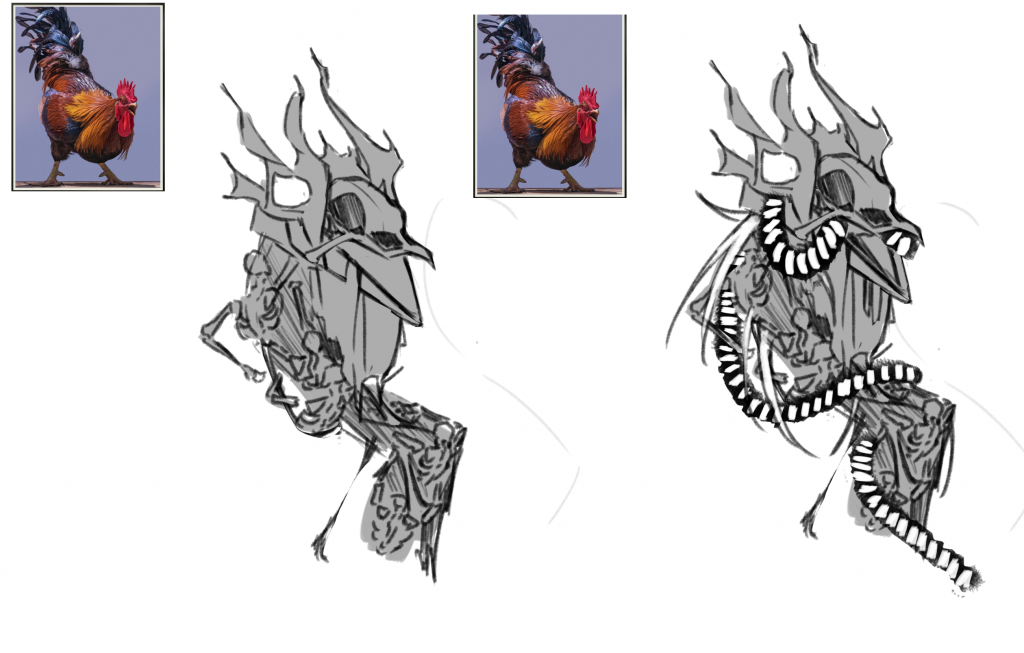

Peer review: love the flow of the tubes/pipes on 1b.
The third sketch felt overly-detailed, while the second sketch lacked clear silhouette around the mouth area, even though I loved how exaggerated the inside of its mouth was. Hence, I tried to combine these elements from the previous designs into the 4th sketch. The 4th sketch shows an upside down chicken, where the ‘neck’ that supports the upper skull of the chicken is the exaggerated and elongated interior of its mouth (choanal papillae). I came to conclusion where the 4th sketch was the final and chosen one as it expressed its disgusting body horror yet still maintaining a predatory pose which adds to its danger aspect. Furthermore, the spiky / triangular shape on its ‘neck’ is a good shape language for danger while the circular motion of the neck adds to its fluidity.
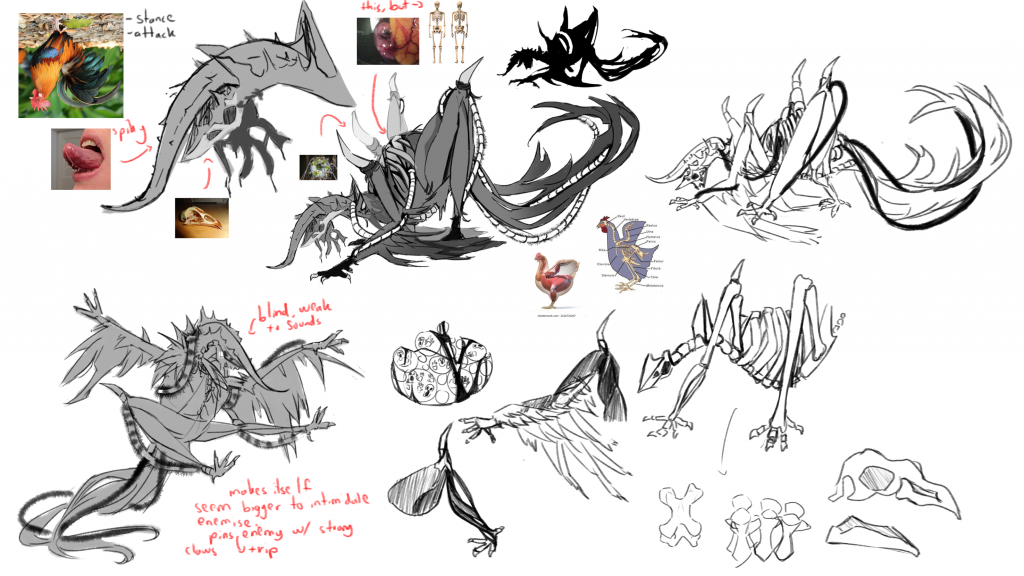
Character Sheet
Afterward, I created a character sheet containing essential information and visuals that would support me in the 3D sculpting process. This sheet includes textures and references for different parts of the chicken’s body, the muscle and skeleton anatomy of the chicken, and its signature attack pose. I wanted to maintain my chicken’s design to the established world setting from the mind map my team and I developed, which blended both organic and inorganic elements. To reflect this, I used inorganic elements, such as the laboratory tubes/pipes while maintaining the organic form of a chicken. Furthermore, drawing inspiration from Tooth Wu’s dragon design (2019), I wanted the chicken to have 90% of its body composed of flesh, with some of its remaining skin appearing melted from the intense heat of a nuclear explosion. Including these references are guides to ensure consistency and realism of the design.
By creating the character sheet, I could imagine how the character would turn out. Hence, I chose the colour palette for the chicken: 1. red (the flesh), 2. white/gray (the skeleton), 3. green (uranium fluid)
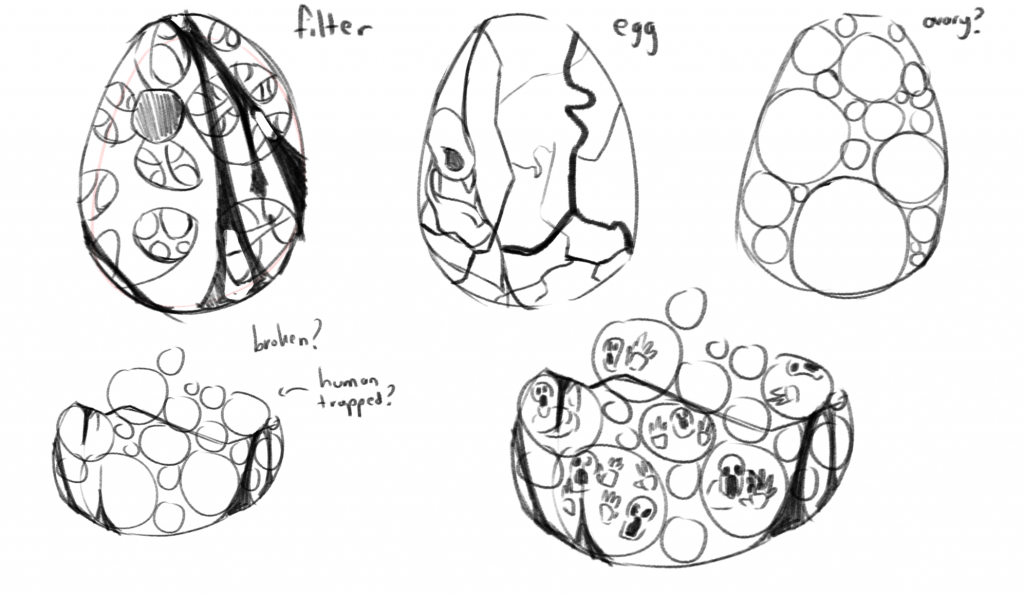
Before creating the character sheet above, I began by sketching some designs for the chicken’s body. I wanted to include an iconic feature of chickens and that was an egg. Inspired by the Huterian visit, I initially designed the egg after a camel’s stomach anatomy, but I thought that it was too complex, leading to the distraction of the whole design of the chicken. While researching, I discovered a YouTube video that provided insightful information and footage of a chicken’s internal organs titled ‘Poultry anatomy and necropsy‘ by Jacquie Jacob (2014). The video showed the reproductive system of the female chicken/hen. It made me realised how it could complement my concept character’s body horror, hence including the ovary/ovum in the egg. Furthermore, I included inspiration from The Forest (2018) into the egg by incorporating body parts of the deceased scientists into the ovum. Since an ordinary eggshell would hide this horror visual, I altered the concept of the eggshell into an eggshell membrane, which is a clear film that allowed the unsettling visuals to be seen.
After that, I decided to sketch the character’s turnaround to accurately define the details and anatomy before continuing to sculpt it in 3D.
ZBrush Introduction
We were finally introduced to ZBrush during the second week. This class was all about getting used to the layout, shortcuts, buttons, brushes, etc. I decided to check various types of brushes ZBrush had provided and experiment with them, creating an abomination of a monster’s face. Because of my previous ZBrush introductory workshop, I was able to easily familiarise myself with the layouts much faster than I anticipated.
ZBrush Practice
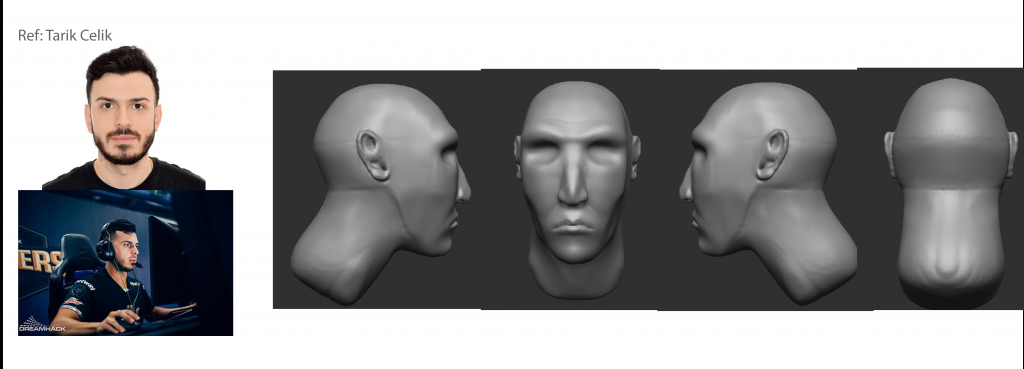
At the time, I wasn’t mentally prepared to begin sculpting for my main project. So, I decided to do a small exercise of sculpting one of my favourite streamers, Tarik Celik. Through this process, I was able to reinforce my ability in sculpting by using various tools, such as the move tool, the gizmo, the flatten brush, the clay brush, then the soften brush. Furthermore, I learnt the general workflow of 3D sculpting which was to create a base model first then slowly sculpting and adding details into the character, adding a sense of realism and character. In the end, I was surprised and quite satisfied with the outcome as this was my first ever serious sculpt in ZBrush. Because of time constraints (I was behind the unit’s schedule, which is sculpting the character) I wasn’t able to sculpt his face details. However, not only did this exercise help me familiarise the ZBrush software, I also gained the confidence to start sculpting my character concept.
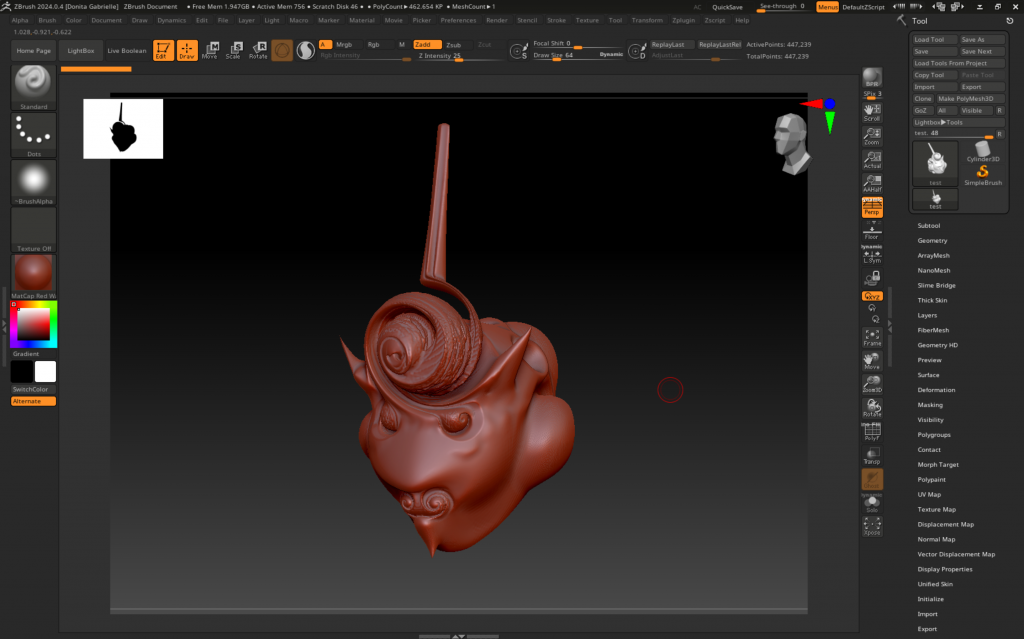
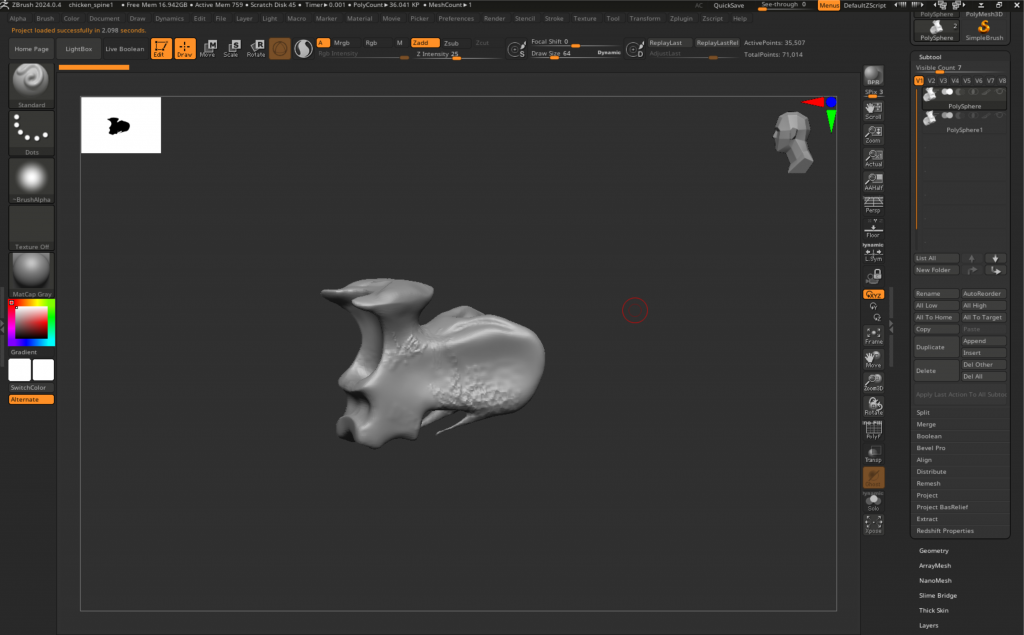
3D Model (skull)
With the initial exercise done, I had familiarise myself with the 3D sculpting workflow. Hence, I began by developing the base mesh of the chicken’s skull shape, then carved out the outlines of the details before refining and sculpting them. By then I discovered a new trick of maintaining the size and shapes from the original concept art, which was to use the Spotlight tool as a blueprint/reference board.
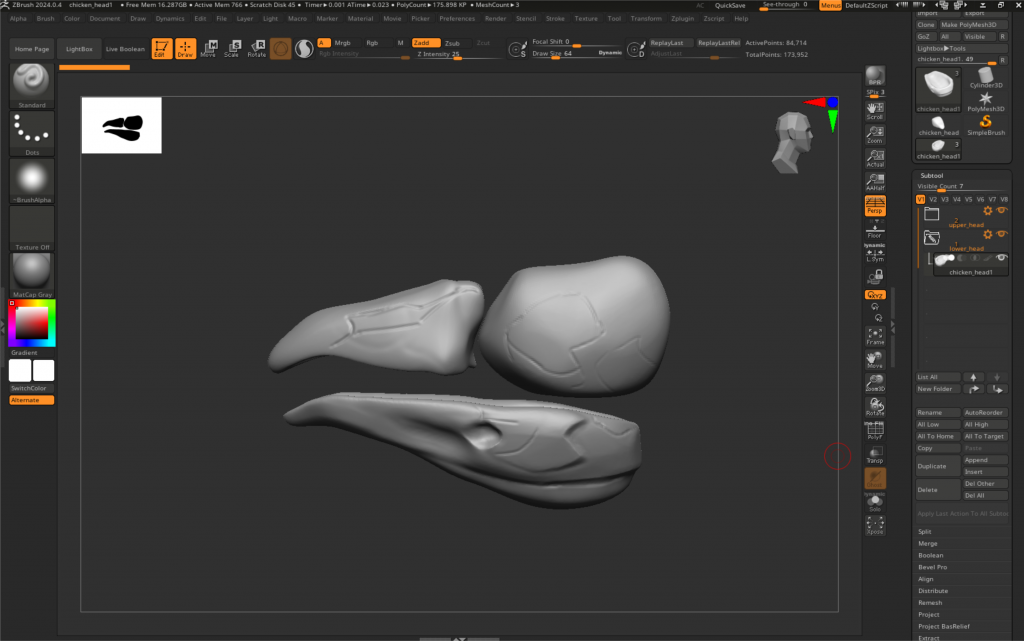
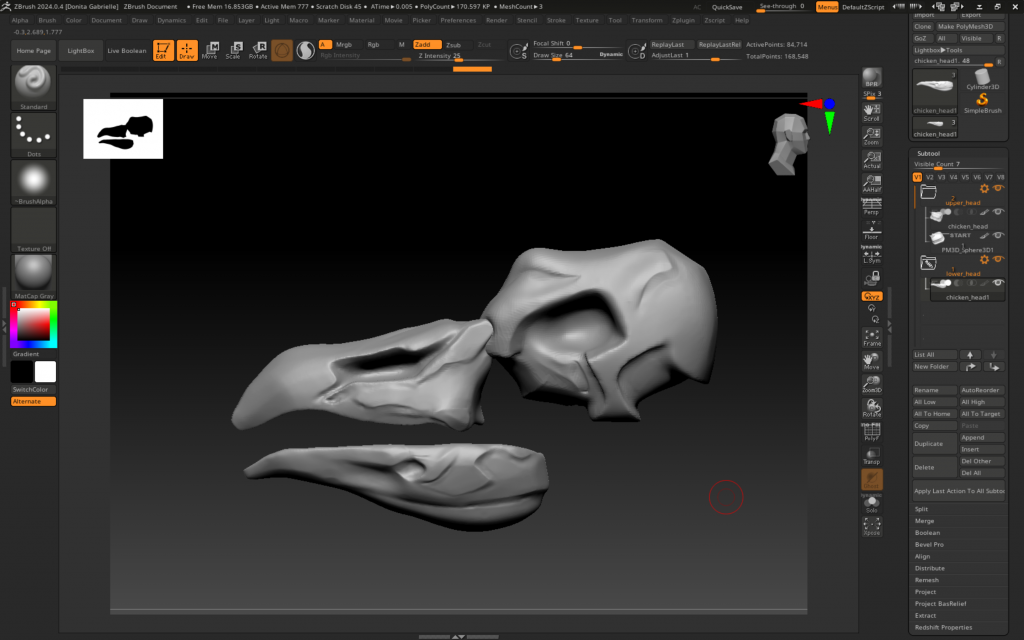
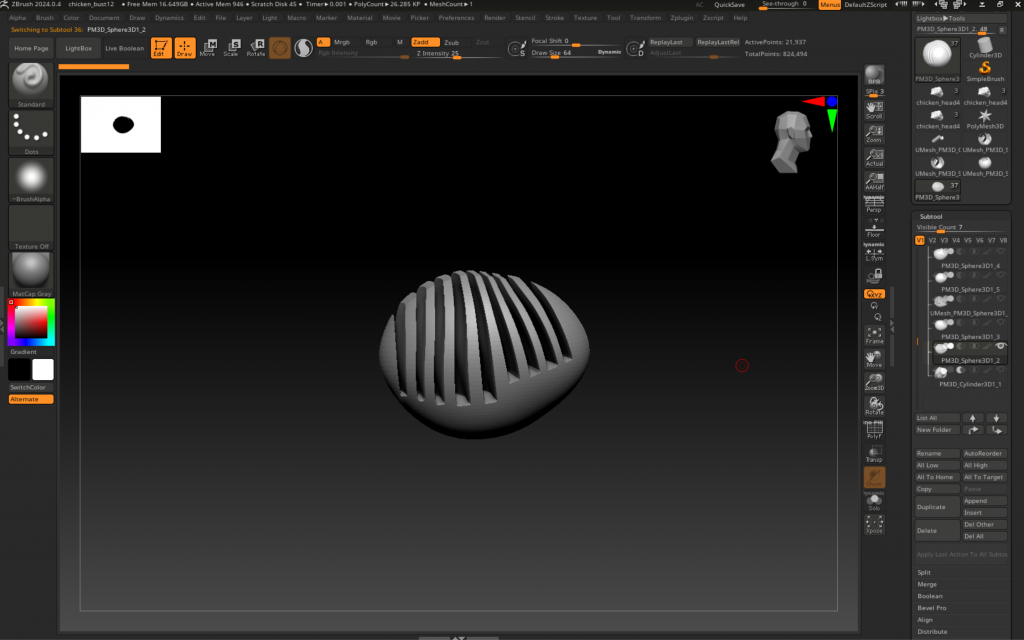
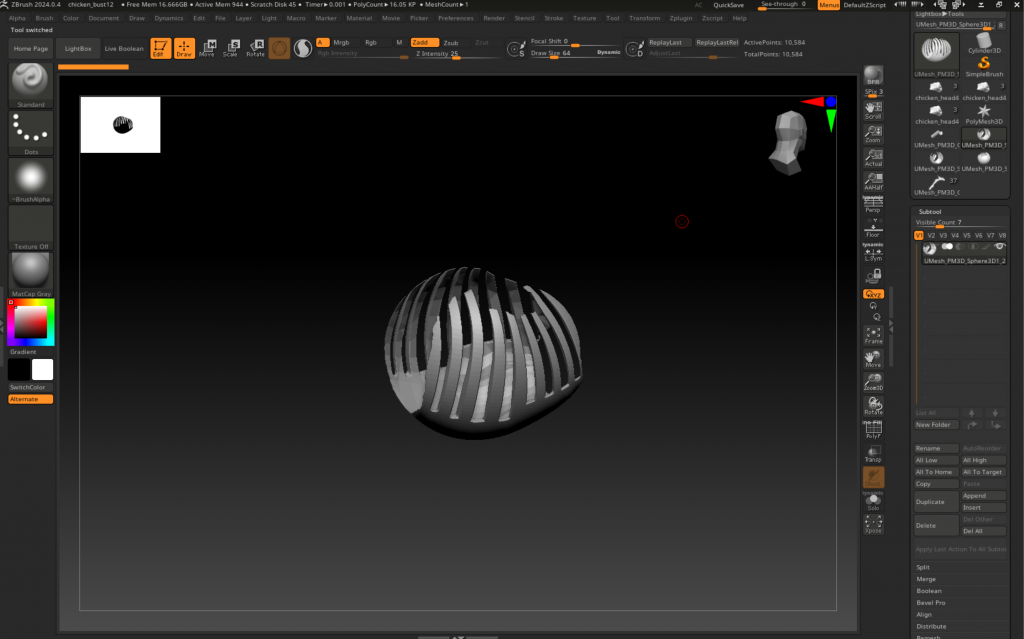
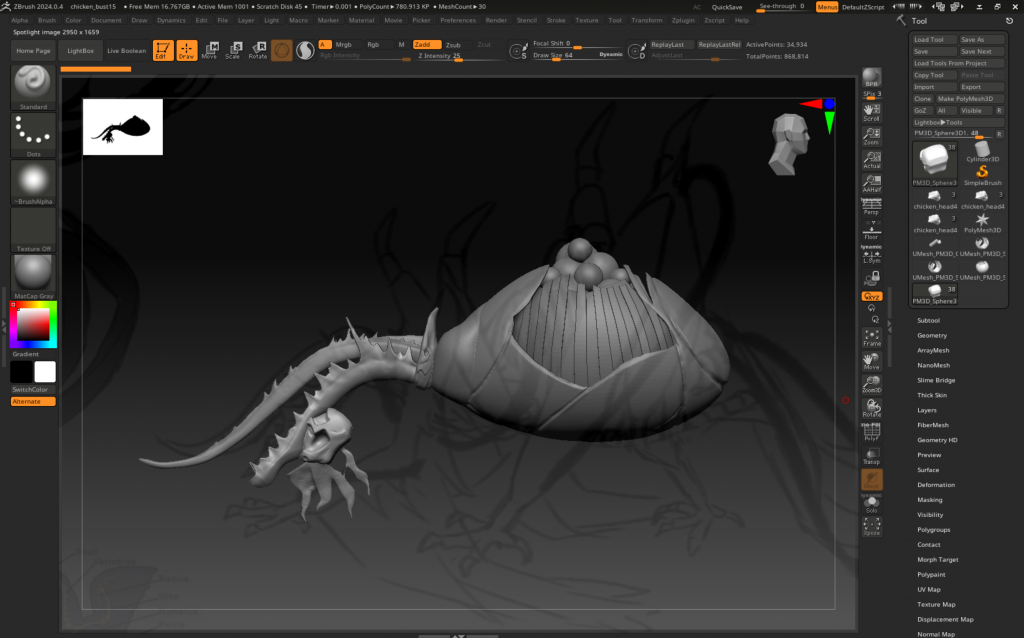
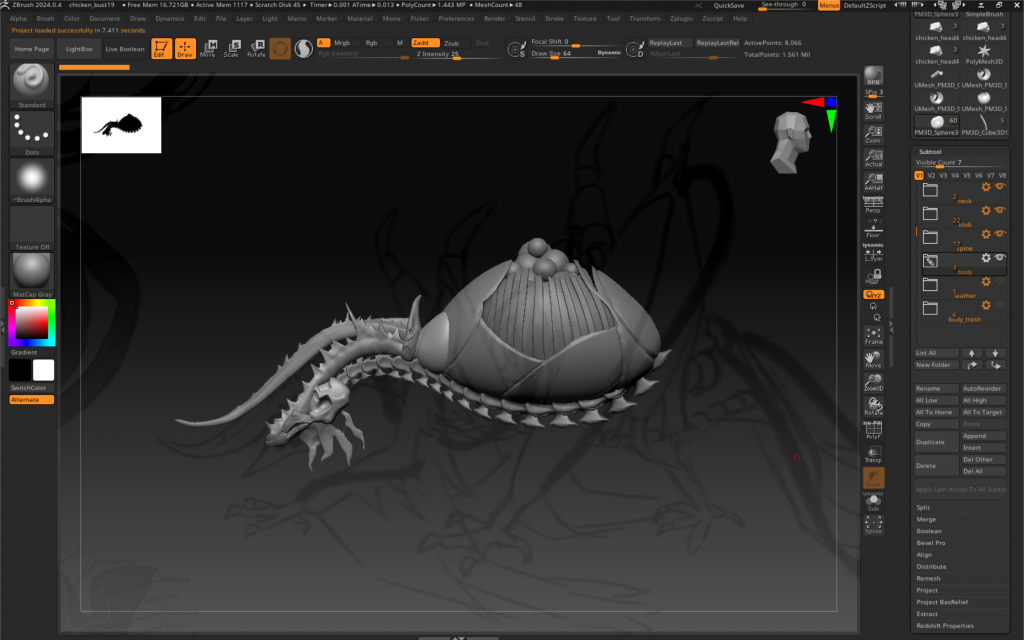
3D Model (body)
The same workflow was used for the entire sculpting process. While I was sculpting the body, I experimented with Live Boolean feature to create the ribcage and a hollow section inside the chicken’s body. To learn this technique, I followed a YouTube tutorial by Null Design titled ‘My Top 3 Methods to Punch a Hole in a Mesh Using ZBrush‘ (2024). He explained how to use the boolean tool by creating a separate mesh in the shape of the hollow section and then applying the ‘Subtract’ mode on that mesh first. Then, activating the ‘Live boolean’ tool would preview the result. Lastly, clicking the ‘Make Boolean Mesh’ on the ‘Boolean’ tool menu would create a new mesh with the applied boolean.

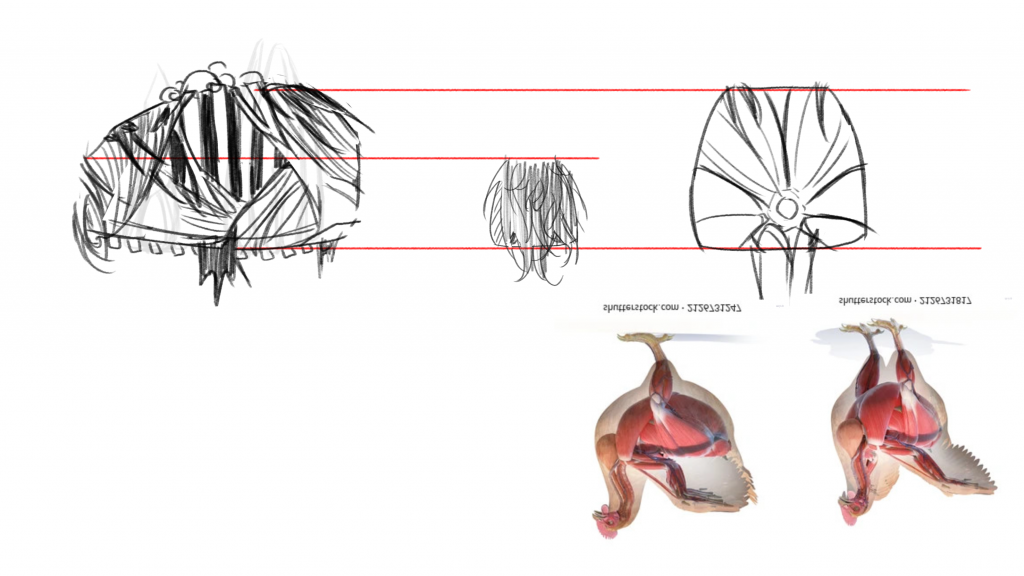
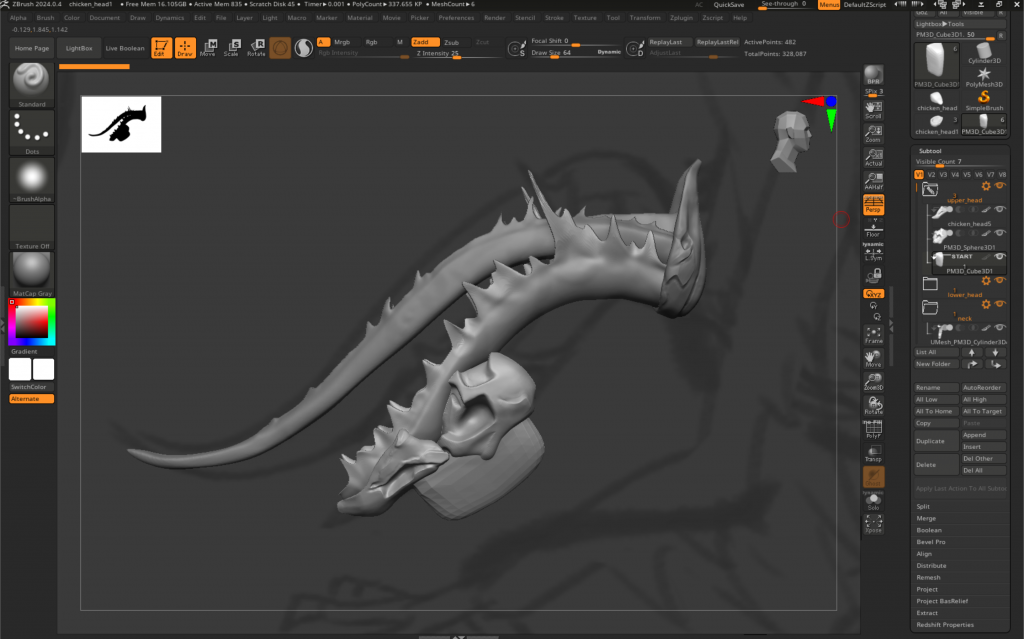
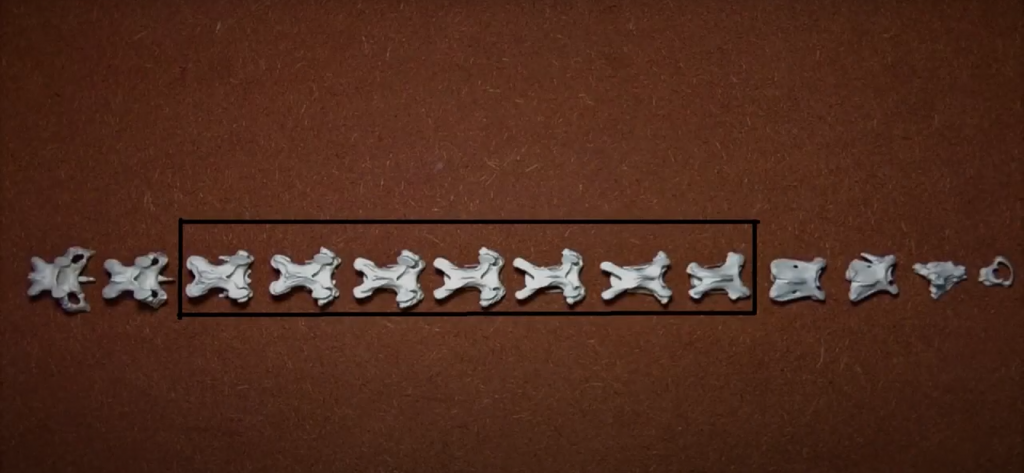
3D Model (spine)
At first, I struggled to find a chicken’s spine reference, as many images online were difficult to understand. However, I found a YouTuber, ThomasTKtungnung who provided clear footage of the chicken’s spine, including its vertebrae in his ‘Chicken skeleton articulation – The vertebrae‘ video (2019). As a result, I was able to accurately sculpt the chicken’s vertebrae individually.

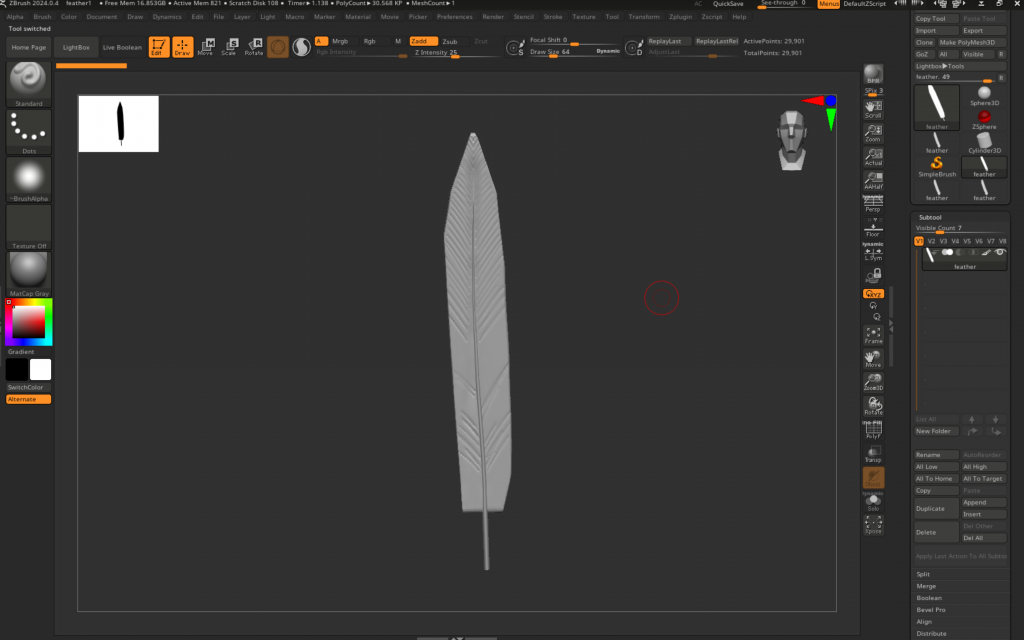
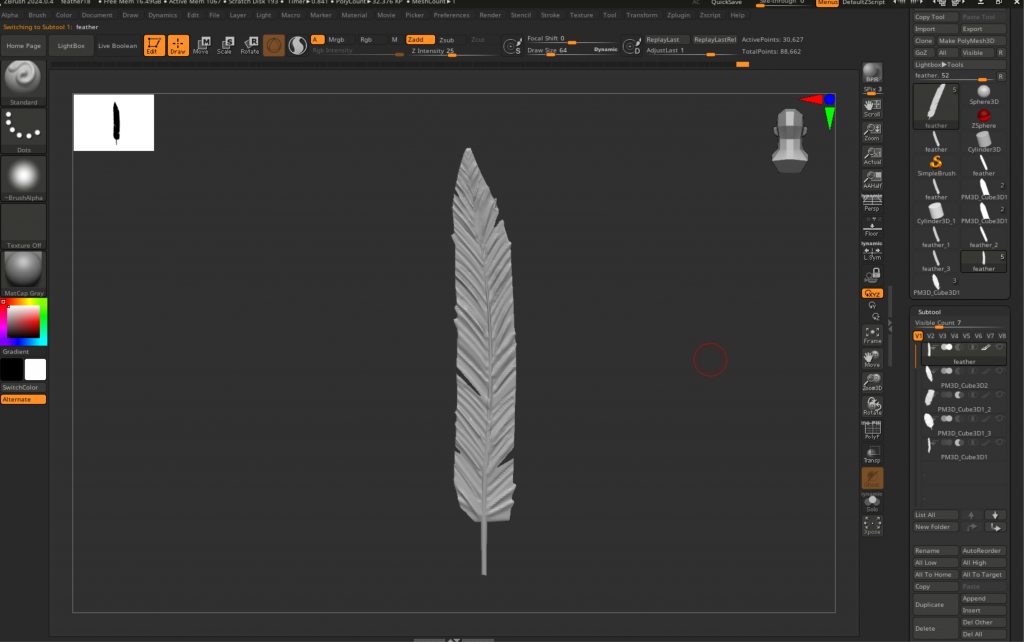
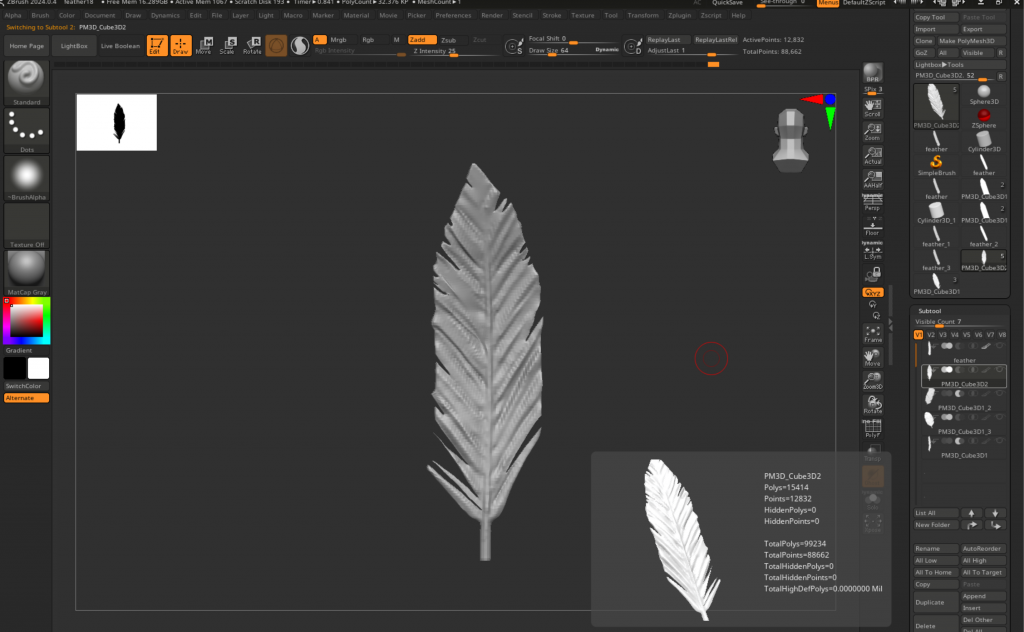
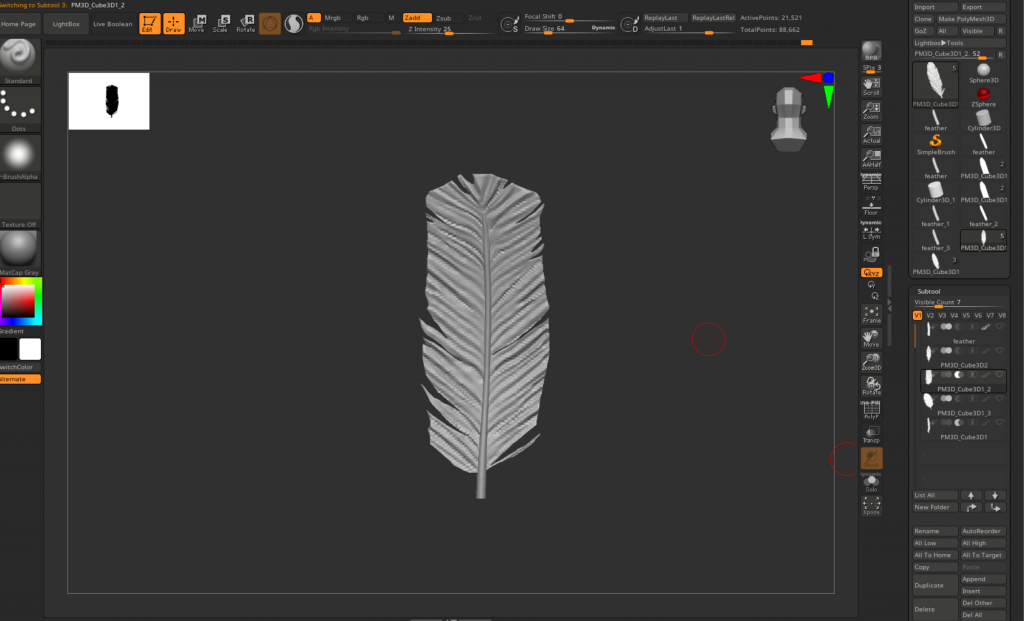
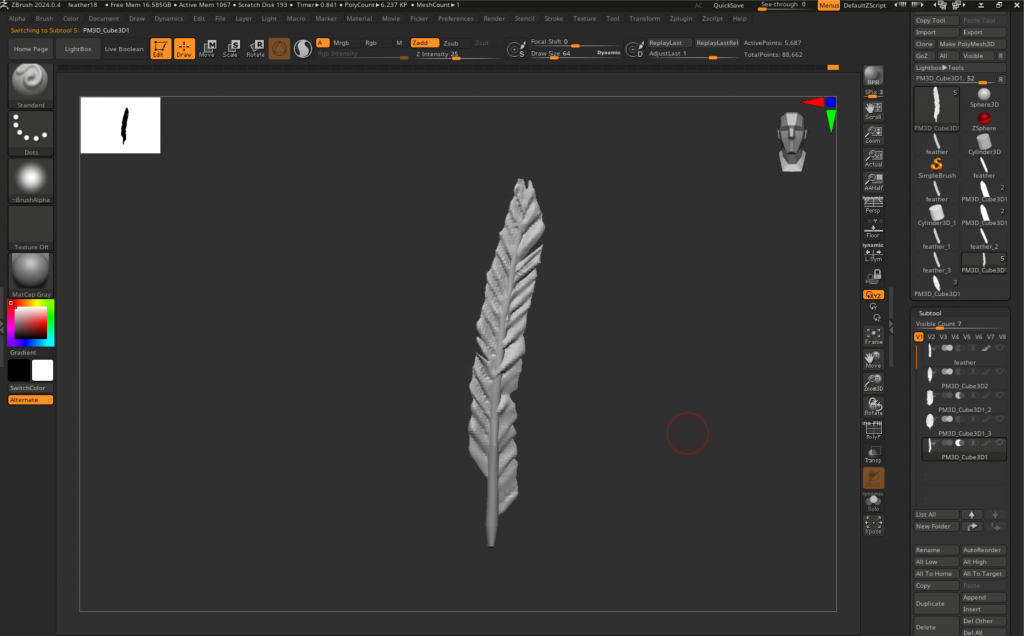
3D Model (feather)
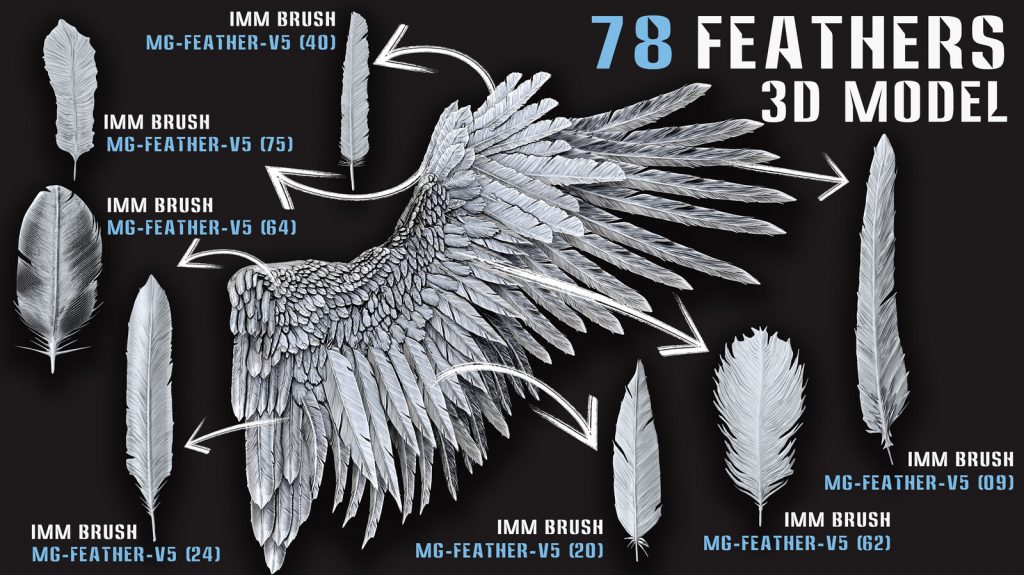
‘How do I sculpt a wing?’ was a question that had been lingering in my mind ever since I started sculpting. However, Mona Ghafourian’s wing model (2024) suggests that achieving highly detailed and realistic wings requires individually modeling the feather first. While I knew that purchasing her feather models or downloading other free models would save time and effort, I’d rather challenge myself to create the entire model from scratch when I still had time. I wanted to learn ZBrush to the fullest before I could ‘cheat’ my way into making 3D models. In the end, I used Ghafourian’s feather models as my references to create my own feather designs. Her work also helped me understand a wing’s structure and the pattern of the feather, which was using broader, rounded feathers for the base and thinner, longer ones for the end of the wing.
While modelling the feather, I learnt a new tool that was really helpful, yet quite problematic and that was the ‘Knife Lasso’ tool. With this knife tool, I could select and cut out parts of the model (feather), hence I was able to create gaps within the structure. However, that tool was the one that caused most of my crashes in ZBrush. From this point forward, I will remember to constantly save my files before and after using that tool. (Additionally, I also learnt how to merge models into 1 by using the Merge tool and then DynaMesh to unify the model)

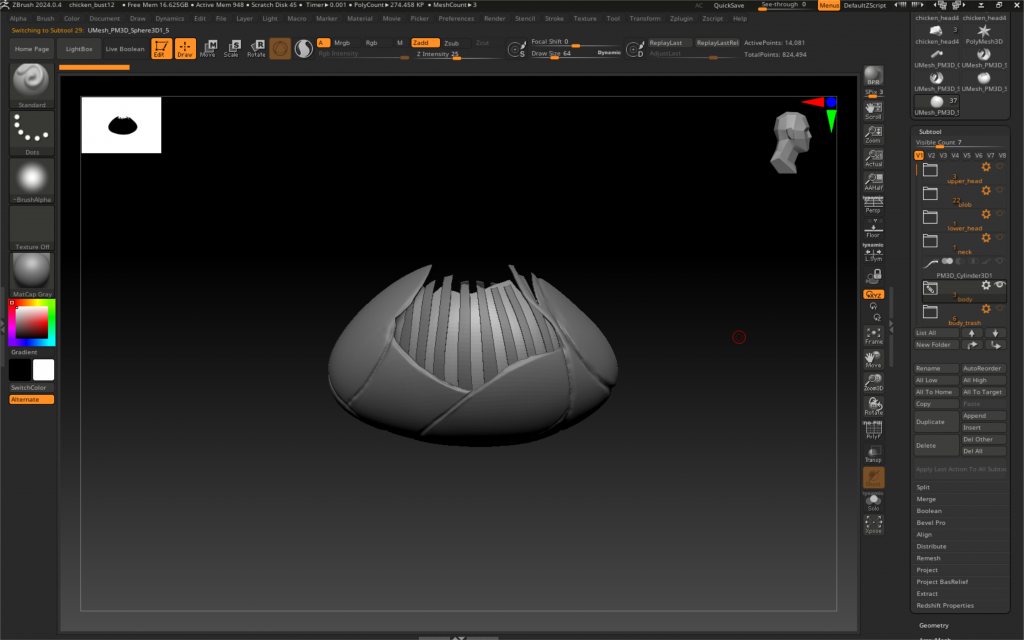
3D Model Progress
I returned to sculpting the chicken’s body, uniting all the models I had created throughout the week. As I was doing so, I decided to make a change from the initial concept art and extend the spine to the front head of the chicken. This adjustment was made to support the chicken’s neck and head movement.
Bibliography
Aaron’s Design Class (2018) Silhouette Drawing Methods. 5 December. Available at: https://www.youtube.com/watch?v=lGL878oEh9k (Accessed: 24 February 2025).
Endnight Games (2018) The Forest [Video game]. Endnight Games. Available at: https://store.steampowered.com/app/242760/The_Forest/ (Accessed: 18 January 2025).
Ghafourian, M. (2024) ‘78 Feathers 3D Model (High, Mid, and Low Poly) – Vol.05’ [Artstation]. 27 June. Available at: https://www.artstation.com/artwork/elOO86 (Accessed: 28 February 2025).
Ishikawa, Y. (2017) ‘THE EVIL WITHIN2 – Effigy’ [Artstation]. 21 December. Available at: https://www.artstation.com/artwork/VKrAP (Accessed: 24 February 2025).
Ishikawa, Y. (2017) ‘THE EVIL WITHIN2 – Matriarch Spider&Tentacle’ [Artstation]. 21 December. Available at: https://www.artstation.com/artwork/dnvEW (Accessed: 24 February 2025).
Ishikawa, Y. (2020) ‘HandCreature’ [Artstation]. 28 June. Available at: https://www.artstation.com/artwork/mDqN0E (Accessed: 24 February 2025).
Jacquie Jacob (2014) Poultry Anatomy and Necropsy. 27 October. Available at: https://www.youtube.com/watch?v=Tek66HVWHo8 (Accessed: 25 February 2025).
Lan, E. (2024) ‘Creatures of Horrors’ [Artstation]. 1 December. Available at: https://www.artstation.com/artwork/rJNgAL (Accessed: 22 February 2025).
Null Design (2024) My Top 3 Methods to Punch a Hole in a Mesh Using ZBrush. 10 April. Available at: https://www.youtube.com/watch?v=nvQADK7U2m8 (Accessed: 25 February 2025).
Pokémon: The First Movie (1998) Directed by Kunihiko Yuyama. [Movie]. Tokyo, Japan: Toho.
ThomasTKtungnung (2019) Chicken skeleton articulation – The vertebrae. 25 March. Available at: https://www.youtube.com/watch?v=Ke2QyE4KoOw (Accessed: 26 February 2025).
Wu, T. (2019) ‘Blood Dragon’ [Artstation]. 29 January. Available at: https://www.artstation.com/artwork/qAo3n2 (Accessed: 20 February 2025).
花先舍 (2024) ‘Tea Flower Painting NO 1’ [Artstation]. 9 January. Available at: https://www.artstation.com/artwork/xD0Dwr (Accessed: 1 February 2025).
黑男 (2022) ‘Tiger’ [Artstation]. 23 January. Available at: https://www.artstation.com/artwork/b5B4aa (Accessed: 15 February 2025).